文章主题:新建样式, 修改文档, PPTX操作, 添加元素(幻灯片
666AI工具大全,助力做AI时代先行者!
ppt可以做的操作:
🎨当然可以!作为一名文案大师,我将帮助你重塑视觉魅力,无论是从零开始设计全新的幻灯片模板,还是巧妙地编辑现有文档。别担心,这不是单纯的PPT复制游戏——而是深入挖掘PPTX的潜力,利用其内置的丰富资源,让你的每一页都熠熠生辉。就像在画布上挥洒自如,只需一点点创意就能点亮整个演示。👩💻
✨🚀掌握PPT大法,轻松呈现专业魅力!📈📊用这些步骤打造完美演示文稿:1️⃣ **幻灯片魔力**:启动幻灯片制作,填充文案的黄金地带,让信息一目了然!2️⃣ 📝**:**文本至胜,巧妙设计,让每字都熠熠生辉,提升阅读体验!3️⃣ 🎨**:**图像说话,精选高质量图片,为内容加分,视觉冲击力满分!🖼️4️⃣ **图表盛宴**:柱状图、条形图、折线图…数据可视化,直观展现趋势与对比!5️⃣ 🔍**:**表格达人,清晰结构,整理信息,逻辑一目了然!6️⃣ 🎯**:**几何图形玩转,多边形、饼图等,丰富视觉层次,提升专业感!7️⃣ **主题定制**:别具一格的标题和主题,彰显你的独特风格!8️⃣ 🔔**:**最后一步,设置PPT属性,让每一页都清晰有力地传达信息!✨记得,简洁明了是王道,让你的PPT成为观众眼中的焦点!🏆SEO优化提示:使用关键词”幻灯片制作”, “文本样式”, “图表设计”, “表格功能”, “几何图形”, “主题设置”等。
使用python 的其他库(Matplotlib,或者基于Matplotlib封装的seanborn)生成图片后,放入ppt中
根据ppt模板修改有两种方式:
1.PPT上的每一个字符都是由python代码生成。
2.查找ppt的文本内容,再修改。
PPT结构说明:
每一张幻灯片叫做:slide幻灯片页;每一页中的每一个方框,叫做一个shape;每一个方框中的每一段内容,叫做Paragraph段落。;块儿run:属于每个段落中的概念
如上概念,对应到ppt包中如下:
实例化prs对象,ppt对象:
0.prs=Presentation() # 可以带参数,参数为ppt模板路径path,
1.获取slide对象:prs.slides 有多少页,就有多少个slide,一个prs有多个slide
2.获取shape形状:slide.shapes 一个slide有多个shape
3.判断每个shpae是否存在文字:shape.has_text_frame
4.获取文字框对象:shape.text_frame
5.获取文字框对象内容:shape.text_frame.text 也可以直接赋值。
prs对象就是一棵树,基本的层次关系如下:
Presentation -> slide_masters -> slide_layouts
Presentation -> slides -> shapes -> placeholders | note | text_frame …
概念:
Presentation 演示文稿构造对象
slide_masters 幻灯片母版 (一个演示文件可以具有多个幻灯片母版) –
slide_layouts 幻灯片布局(属于母版而非 prs)
slides 幻灯片对象组,默认指向第一页 add_slide
shapes 形状,类似于 ps 中的画布,每个 shap (如 table) 相当于图层 add_shape
placeholders… 占位符,字典辅助类,每一个方框中都可以输入文字,或者输入其他类型的内容,该方框就叫占位符Placeholder
根据placeholdes获取一页幻灯片中的元素,slide.shapes.placeholders,使用该函数返回的对象下标访问.text 赋值,该下标的访问个数,是通过slide_layouts[*]定义时,所产生的。比如设置0,则有一个title和一个subtitle ,可以通过slide.shpaes.title 访问title对象,并调用title对象的text属性 赋值,达到设置幻灯片标题的目的。
幻灯片布局
(版式,在windows ppt中有对应的下拉框) prs.slide_layouts[0],根据参数的不同,设置不同的幻灯片布局,传入0获取第一个版式(也就是幻灯片布局)
0 -> title and subtitle 标题和副标题
1 -> title and content 标题和内容
2 -> section header 标题
3 -> two content 一个标题,两个内容
4 -> Comparison 一个标题,两个副标题,两个内容
5 -> Title only 仅标题
6 -> Blank 空白
7 -> Content with caption
8 -> Pic with caption 带标题的图片
如下两种方式等价。
prs = Presentation()
prs.slide_masters[0].slide_layouts[0]
prs.slide_layouts[0]
导入包
from pptx import Presentation
from pptx.chart.data import ChartData,XyChartData,BubbleChartData,CategoryChartData
from pptx.enum.chart import XL_CHART_TYPE,XL_LABEL_POSITION,XL_LEGEND_POSITION
from pptx.util import Inches
from pptx.enum.text import MSO_ANCHOR, MSO_AUTO_SIZE,MSO_VERTICAL_ANCHOR,PP_PARAGRAPH_ALIGNMENT,PP_ALIGN
from pptx.dml.color import RGBColor
from pptx.enum.dml import MSO_THEME_COLOR
from pptx.enum.shapes import MSO_SHAPE_TYPE,MSO_SHAPE
from pptx.util import Pt,Cm
初始化对象
如果模板中存在ppt页面,则可以通过下标选择ppt,否则可以通过函数在最后追加ppt
prs = Presentation(./yishilumuban.pptx)
1.通过下标访问ppt slide
选择在已经存在的ppt页写入数据
设置添加到当前ppt哪一页
n_page = 0
# 定义内容:
singleLineContent = “我是单行内容”
multiLineContent = \
“””我是多行内容1
我是多行内容2
我是多行内容3
“””
# 获取需要添加文字的页面对象
slide0 = prs.slides[n_page]
# slide0=prs.slides.add_slide(prs.slide_layouts[1])
# 设置幻灯片标题
title_placeholder0=slide0.shapes.title
title_placeholder0.text=Hello World
添加单行内容
# 设置添加文字框的位置以及大小
left, top, width, height = Cm(1.9), Cm(1), Cm(12), Cm(1.2)
# 添加文字段落 slide.shapes.add_textbox(距离左边,距离顶端,宽度,高度)
new_paragraph0 = slide0.shapes.add_textbox(left=left, top=top, width=width, height=height).text_frame
# 设置段落内容
new_paragraph0.paragraphs[0].text = singleLineContent
# 设置文字大小
new_paragraph0.paragraphs[0].font.size = Pt(15)
添加多行
# 设置添加文字框的位置以及大小
left, top, width, height = Cm(1.9), Cm(3), Cm(12), Cm(3.6)
# 添加文字段落
new_paragraph2 = slide0.shapes.add_textbox(left=left, top=top, width=width, height=height).text_frame
# 设置段落内容
new_paragraph2.paragraphs[0].text = multiLineContent
# 设置文字大小
new_paragraph2.paragraphs[0].font.size = Pt(15)
设置文字框样式与文字样式
left, top, width, height = Cm(16.9), Cm(1), Cm(12), Cm(1.2)
textBox = slide0.shapes.add_textbox(left=left, top=top, width=width, height=height)
# 调整文本框背景颜色
textBoxFill = textBox.fill
textBoxFill.solid() # 纯色填充 RGB颜色:https://www.w3schools.com/colors/colors_rgb.asp RGB Color Codes Chart
textBoxFill.fore_color.rgb = RGBColor(187, 255, 255)
# 文本框边框样式调整
line = textBox.line
line.color.rgb = RGBColor(0, 255, 0)
line.width = Cm(0.1)
# 获取文本框对象
tf = textBox.text_frame
# 文本框样式调整
tf.margin_bottom = Cm(0.1) # 下边距
tf.margin_left = 0 # 左边距
tf.vertical_anchor = MSO_VERTICAL_ANCHOR.BOTTOM # 对齐文本方式:底端对齐
tf.word_wrap = True # 文本框的文字自动对齐
text_frame.auto_size = MSO_AUTO_SIZE.SHAPE_TO_FIT_TEXT
# 设置内容
tf.paragraphs[0].text = 这是一段文本框里的文字
# 字体样式调整
tf.paragraphs[0].alignment = PP_ALIGN.CENTER # 对齐方式 DISTRIBUTE JUSTIFY JUSTIFY_LOW LEFT RIGHT THAI_DISTRIBUTE MIXED
tf.paragraphs[0].font.name = 微软雅黑 # 字体名称
tf.paragraphs[0].font.bold = True # 是否加粗
tf.paragraphs[0].font.italic = True # 是否斜体
tf.paragraphs[0].font.color.rgb = RGBColor(255, 0, 0) # 字体颜色
tf.paragraphs[0].font.size = Pt(20) # 字体大小
使用文本 slide2
# add_slide 将幻灯片添加到集合末尾。
slide1 = prs.slides.add_slide(prs.slide_layouts[1])
# 也可以直接访问:slide.shapes.title.text = ” Created By python-pptx”
title_placeholder1=slide1.shapes.title
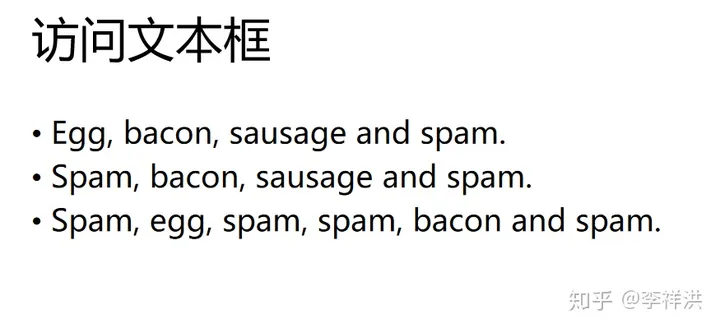
title_placeholder1.text=访问文本框
# 对形状类型进行检查,确保可以使用文本框
for shape in slide1.shapes:
if not shape.has_text_frame:
continue
text_frame = shape.text_frame
# —————-
# 访问段落。一个文本框包含至少一个段落,
paragraph_strs = [
Egg, bacon, sausage and spam.,
Spam, bacon, sausage and spam.,
Spam, egg, spam, spam, bacon and spam.
]
text_frame.clear() # remove any existing paragraphs, leaving one empty one
p = text_frame.paragraphs[0]
p.text = paragraph_strs[0]
for para_str in paragraph_strs[1:]:
p = text_frame.add_paragraph()# 新增paragraph
p.text = para_str
应用字符格式
slide2 = prs.slides.add_slide(prs.slide_layouts[1])
title_placeholder2=slide2.shapes.title
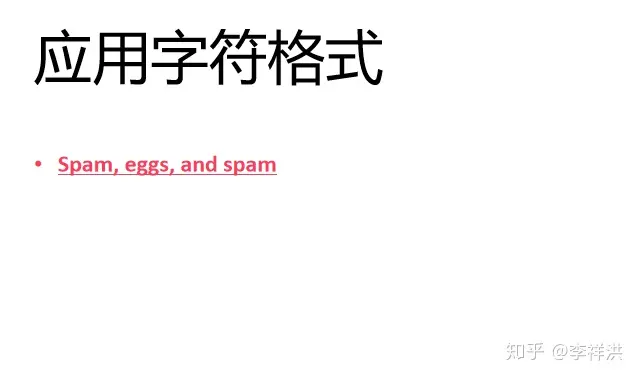
title_placeholder2.text=应用字符格式
for shape in slide2.shapes:
if not shape.has_text_frame:
continue
text_frame = shape.text_frame
p = text_frame.paragraphs[0]
run = p.add_run()
run.text = Spam, eggs, and spam
# 设置超链接
run.hyperlink.address = scanny/python-pptx #
font = run.font
font.name -  = Calibri
font.size = Pt(18)
font.bold = True
font.italic = None # cause value to be inherited from theme
font.color.theme_color = MSO_THEME_COLOR.ACCENT_1
图形
可以通过其他第三方的库比如
Matplotlib可视化成图片,在ppt中插入图片即可
柱状图
slide3 = prs.slides.add_slide(prs.slide_layouts[5])
title_placeholder3=slide3.shapes.title
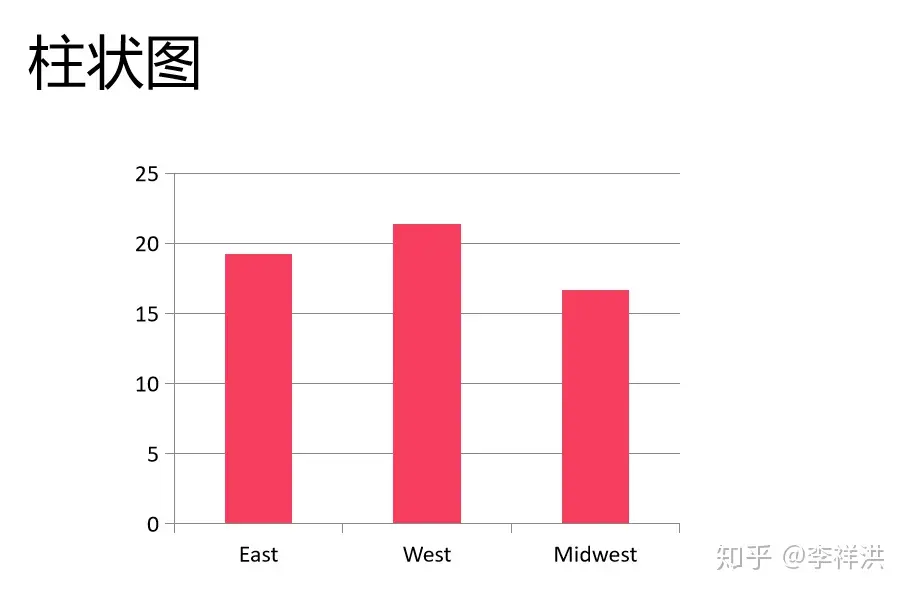
title_placeholder3.text=柱状图
# 2. 创建图表数据
chart_data = CategoryChartData()
chart_data.categories = [East, West, Midwest]
chart_data.add_series(Series 1, (19.2, 21.4, 16.7))
# 添加数据到s幻灯片
x, y, cx, cy = Inches(2), Inches(2), Inches(6), Inches(4.5)
slide3.shapes.add_chart(
XL_CHART_TYPE.COLUMN_CLUSTERED, x, y, cx, cy, chart_data
)
# 在柱状图傍显示图列
chart.has_legend = True
chart.legend.position = XL_LEGEND_POSITION.RIGHT
chart.legend.include_in_layout = False
plot = chart.plots[0]
plot.has_data_labels = True
data_labels = plot.data_labels
data_labels.font.size = Pt(13)
data_labels.font.color.rgb = RGBColor(0x0A, 0x42, 0x80)
data_labels.position = XL_LABEL_POSITION.INSIDE_END
多柱状图
slide4 = prs.slides.add_slide(prs.slide_layouts[5])
title_placeholder4=slide4.shapes.title
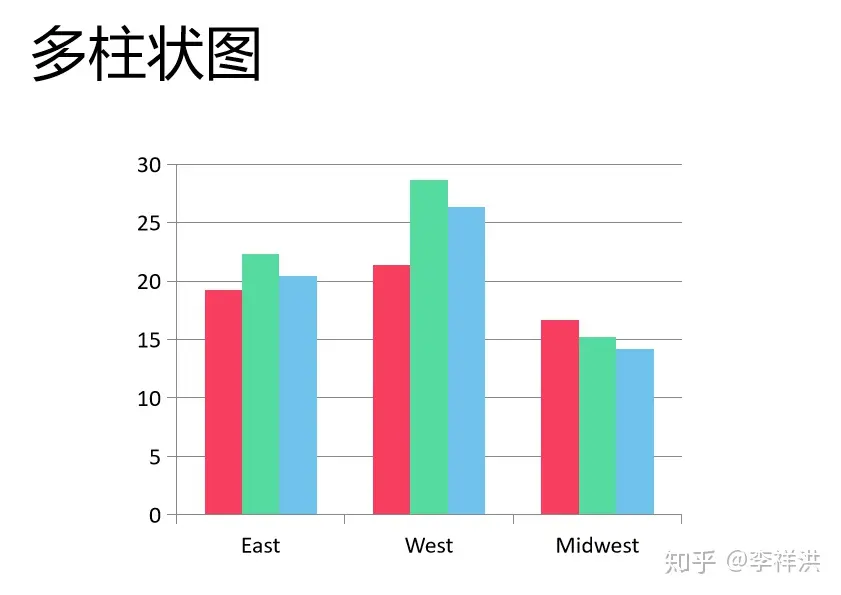
title_placeholder4.text=多柱状图
chart_data = ChartData()
chart_data.categories = [East, West, Midwest]
chart_data.add_series(Q1 Sales, (19.2, 21.4, 16.7))
chart_data.add_series(Q2 Sales, (22.3, 28.6, 15.2))
chart_data.add_series(Q3 Sales, (20.4, 26.3, 14.2))
graphic_frame = slide4.shapes.add_chart(
XL_CHART_TYPE.COLUMN_CLUSTERED, x, y, cx, cy, chart_data
)
chart = graphic_frame.chart
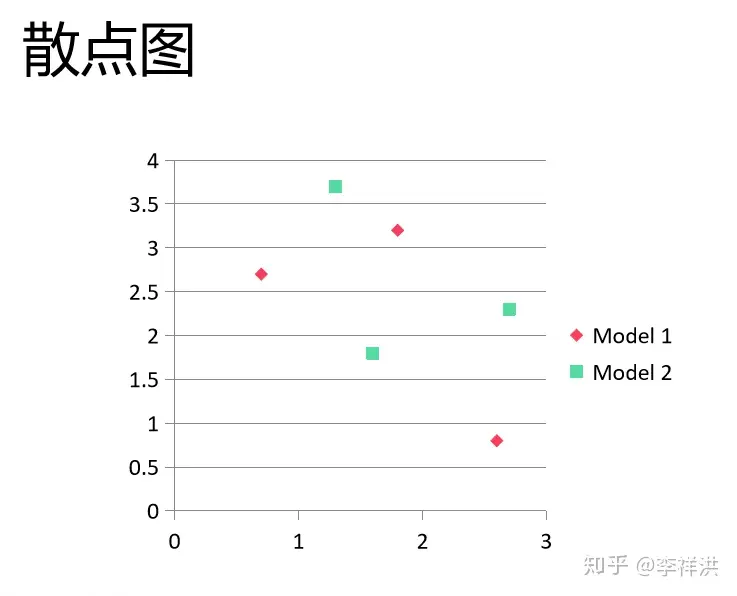
散点图
slide5 = prs.slides.add_slide(prs.slide_layouts[5])
title_placeholder5=slide5.shapes.title
title_placeholder5.text=散点图
chart_data = XyChartData()
series_1 = chart_data.add_series(Model 1)
series_1.add_data_point(0.7, 2.7)
series_1.add_data_point(1.8, 3.2)
series_1.add_data_point(2.6, 0.8)
series_2 = chart_data.add_series(Model 2)
series_2.add_data_point(1.3, 3.7)
series_2.add_data_point(2.7, 2.3)
series_2.add_data_point(1.6, 1.8)
chart = slide5.shapes.add_chart(
XL_CHART_TYPE.XY_SCATTER, x, y, cx, cy, chart_data
).chart
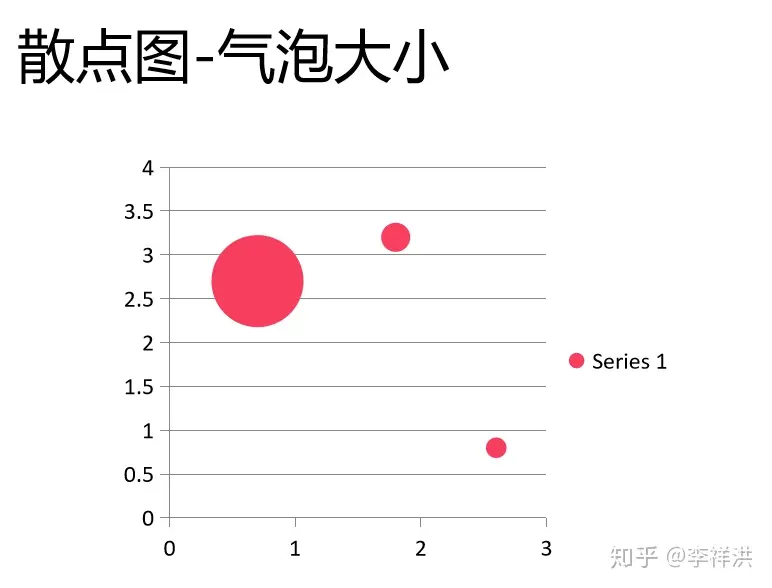
根据数据大小设置大小的气泡图
slide6 = prs.slides.add_slide(prs.slide_layouts[5])
title_placeholder6=slide6.shapes.title
title_placeholder6.text=散点图-气泡大小
chart_data = BubbleChartData()
series_1 = chart_data.add_series(Series 1)
series_1.add_data_point(0.7, 2.7, 10)
series_1.add_data_point(1.8, 3.2, 1)
series_1.add_data_point(2.6, 0.8, 0.5)
chart = slide6.shapes.add_chart(
XL_CHART_TYPE.BUBBLE, x, y, cx, cy, chart_data
).chart
折线图
slide7 = prs.slides.add_slide(prs.slide_layouts[5])
title_placeholder7=slide7.shapes.title
title_placeholder7.text=折线图
chart_data = CategoryChartData()
chart_data.categories = [Q1 Sales, Q2 Sales, Q3 Sales]
chart_data.add_series(West, (32.2, 28.4, 34.7))
chart_data.add_series(East, (24.3, 30.6, 20.2))
chart_data.add_series(Midwest, (20.4, 18.3, 26.2))
x, y, cx, cy = Inches(2), Inches(2), Inches(6), Inches(4.5)
chart = slide7.shapes.add_chart(
XL_CHART_TYPE.LINE, x, y, cx, cy, chart_data
).chart
chart.has_legend = True
chart.legend.include_in_layout = False
chart.series[0].smooth = True# 是否平滑
chart.font.size = Pt(10) # 文字大小
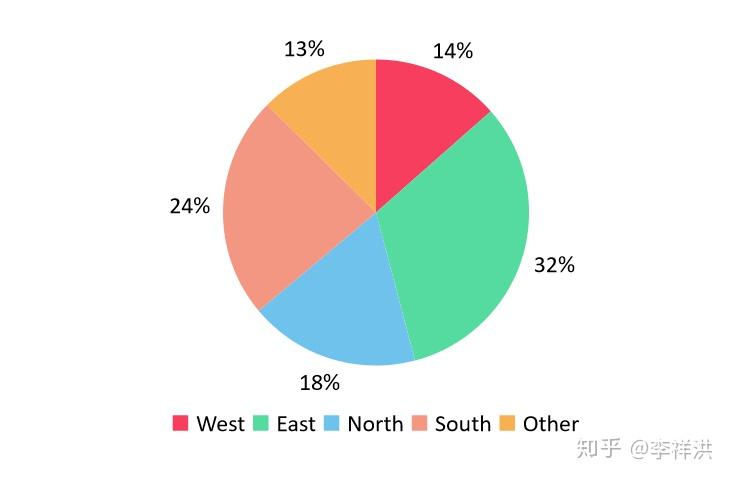
饼图
slide8 = prs.slides.add_slide(prs.slide_layouts[5])
title_placeholder8=slide8.shapes.title
title_placeholder8.text=折线图
chart_data = ChartData()
chart_data.categories = [West, East, North, South, Other]
chart_data.add_series(Series 1, (0.135, 0.324, 0.180, 0.235, 0.126))
chart = slide8.shapes.add_chart(
XL_CHART_TYPE.PIE, x, y, cx, cy, chart_data
).chart
chart.has_legend = True
chart.legend.position = XL_LEGEND_POSITION.BOTTOM
chart.legend.include_in_layout = False
chart.plots[0].has_data_labels = True
data_labels = chart.plots[0].data_labels
data_labels.number_format = 0%
data_labels.position = XL_LABEL_POSITION.OUTSIDE_END
其他图表
https://python-pptx.readthedocs.io/en/latest/api/chart.html#chart-api 或者使用其他库,生成图表
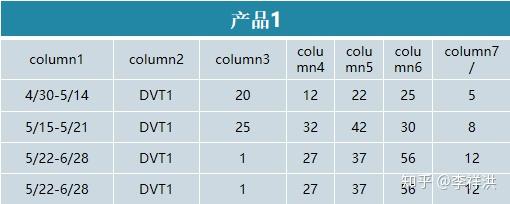
表格:
slide9 = prs.slides.add_slide(prs.slide_layouts[1])
# 设置表格位置和大小
left, top, width, height = Cm(1), Cm(1), Cm(13.6), Cm(5)
# 1.表格行列数,和大小 并添加表格到幻灯片 shapes.add_table(rows, cols, left, top, width, height)
shape = slide9.shapes.add_table(6, 7, left, top, width, height)# 返回表格形状,而不是表格本身。
# 访问表格对象
table = shape.table
# shape.has_table 判断是否包含表格。
# 设置列宽
table.columns[0].width = Cm(3)
table.columns[1].width = Cm(2.3)
table.columns[2].width = Cm(2.3)
table.columns[3].width = Cm(1.3)
table.columns[4].width = Cm(1.3)
table.columns[5].width = Cm(1.3)
table.columns[6].width = Cm(2.1)
# 设置行高
table.rows[0].height = Cm(1)
# 合并首行
table.cell(0, 0).merge(table.cell(0, 6))
# 填写标题
table.cell(1, 0).text = “column1”
table.cell(1, 1).text = “column2”
table.cell(1, 2).text = “column3”
table.cell(1, 3).text = “column4”
table.cell(1, 4).text = “column5”
table.cell(1, 5).text = “column6”
table.cell(1, 6).text = “column7/”
# 填写变量内容
table.cell(0, 0).text = “产品1”
content_arr = [[“4/30-5/14”, “DVT1”, “20”, “12”, “22”, “25”, “5”],
[“5/15-5/21”, “DVT1”, “25”, “32”, “42”, “30”, “8”],
[“5/22-6/28”, “DVT1”, “1”, “27”, “37”, “56”, “12”],
[“5/22-6/28”, “DVT1”, “1”, “27”, “37”, “56”, “12”]]
# 修改表格样式
for rows in range(6):
for cols in range(7):
# Write column titles
if rows == 0:
# 设置文字大小
table.cell(rows, cols).text_frame.paragraphs[0].font.size = Pt(15)
# 设置字体
table.cell(rows, cols).text_frame.paragraphs[0].font.name = 微软雅黑
# 设置文字颜色
table.cell(rows, cols).text_frame.paragraphs[0].font.color.rgb = RGBColor(255, 255, 255)
# 设置文字左右对齐
table.cell(rows, cols).text_frame.paragraphs[0].alignment = PP_ALIGN.CENTER
# 设置文字上下对齐
table.cell(rows, cols).vertical_anchor = MSO_ANCHOR.MIDDLE
# 设置背景为填充
table.cell(rows, cols).fill.solid()
# 设置背景颜色
table.cell(rows, cols).fill.fore_color.rgb = RGBColor(34, 134, 165)
elif rows == 1:
table.cell(rows, cols).text_frame.paragraphs[0].font.size = Pt(10)
table.cell(rows, cols).text_frame.paragraphs[0].font.name = 微软雅黑 # 字体名称
table.cell(rows, cols).text_frame.paragraphs[0].font.color.rgb = RGBColor(0, 0, 0)
table.cell(rows, cols).text_frame.paragraphs[0].alignment = PP_ALIGN.CENTER
table.cell(rows, cols).vertical_anchor = MSO_ANCHOR.MIDDLE
table.cell(rows, cols).fill.solid()
table.cell(rows, cols).fill.fore_color.rgb = RGBColor(204, 217, 225)
else:
table.cell(rows, cols).text = content_arr[rows – 2][cols]
table.cell(rows, cols).text_frame.paragraphs[0].font.size = Pt(10)
table.cell(rows, cols).text_frame.paragraphs[0].font.name = 微软雅黑 # 字体名称
table.cell(rows, cols).text_frame.paragraphs[0].font.color.rgb = RGBColor(0, 0, 0)
table.cell(rows, cols).text_frame.paragraphs[0].alignment = PP_ALIGN.CENTER
table.cell(rows, cols).vertical_anchor = MSO_ANCHOR.MIDDLE
table.cell(rows, cols).fill.solid()
table.cell(rows, cols).fill.fore_color.rgb = RGBColor(204, 217, 225)

表格2 shapes.add_table(rows, cols, left, top, width, height)
black_slide_layout=prs.slide_layouts[6]
slide=prs.slides.add_slide(black_slide_layout)
shapes=slide.shapes
rows, cols = 5, 3
left = top = Cm(5)
width = Cm(18)
height = Cm(3)
table=shapes.add_table(rows,cols,left,top,width,height).table
table.columns[0].width=Cm(6)
table.columns[1].width=Cm(2)
table.columns[2].width=Cm(2)
table.rows[0].height=Cm(2)
data = [
[“姓名”,“性别”,“成绩”],
[“张三”,“男”,96],
[“李四”,“女”,87],
[“王五”,“女”,90],
[“赵六”,“男”,78]
]
for row in range(rows):
for col in range(cols):
table.cell(row,col).text = str(data[row][col])
图片:
slide10 = prs.slides.add_slide(prs.slide_layouts[1])
# 设置待添加的图片
img_name = 微信图片_20201215184251.png
# 设置位置
left, top, width, height = Cm(6), Cm(6), Cm(20), Cm(9)
# 进行添加 slide.shapes.add_picturs(图片路径, 距离左边, 距离顶端, 宽度, 高度)
slide10.shapes.add_picture(image_file=img_name,left=left,top=top,width=width,height=height)
保存
prs.save(test.pptx)
读取表格内容
# 打开待读取的ppt文件
ppt = Presentation(test.pptx)
# 获取第0张
slide0 = ppt.slides[3]
# 遍历所有内容
for shape in slide0.shapes:
# 打印shape名称
print(shape.shape_type)
# 判断是否为表格
if shape.shape_type == MSO_SHAPE_TYPE.TABLE:
#获取表格行
for row in shape.table.rows:
for cell in row.cells:
print(cell.text_frame.text)
删除某一页ppt
def del_slide(prs,index):
slides = list(prs.slides._sldIdLst)
prs.slides._sldIdLst.remove(slides[index])
ppt = Presentation(path.pptx)
# 获取所有页
slides = ppt.slides
number_pages = len(slides)
# 设置需要删除的页面数量
delPageNums = 3
# 进行删除操作(每次都删除第一张ppt)
for index in range(delPageNums):
del_slide(ppt,0)
获取某一页slide的内容
for i ,slide in enumerate(prs.slides):
if i==1:# 第二页
for shape in slide.shapes:
if shape.has_text_frame:
text_frame=shape.text_frame
print(text_frame.text)
获取shape中的全部Paragraph(也可以获取单个Paragraph)
for i,slide in enumerate(prs.slides):
if i==1:
for shape in slide.shapes:
if shape.has_text_frame:
text_frame=shape.text_frame
for paragraph in text_frame.paragraph:
print(paragragh.text)
获取段落和文字块
for slide in pptx.slides:
for shape in slide.shapes:
if shape.has_text_frame:
text_frame = shape.text_frame
for paragraph in text_frame.paragraphs:
for run in paragraph.runs:
print(run.text)
遍历文件夹下所有2007版本以上的ppt文件;遍历每个文件的页面,形状,查找目标内容并替换。
import pptx
from pptx import Presentation
for fpathe,dirs,fs in os.walk(ppt):
for f in fs:
if .pptx in f:
paths=”%s\%s” %(fpathe,f)
print(paths)
prs = Presentation(%s%paths)
for j in range(0,len(prs.slides)):
shape=prs.slides[j].shapes
for i in range(0,len(shape)):
if(shape[i].has_text_frame):
for paragraph in shape[i].text_frame.paragraphs:
for run in paragraph.runs:
if 需要替换的内容 in run.text:
run.text=你的内容
os.makedirs(%s_r%fpathe)
prs.save(%s_r\%s%(fpathe,f))
查找某一页中的run块文本内容,并替换。
import pptx
from pptx import Presentation
prs = Presentation(XX门店客流阶段性报告模板(2).pptx)
shape=prs.slides[0].shapes
for i in range(0,len(shape)):
if(shape[i].has_text_frame):
for paragraph in shape[i].text_frame.paragraphs:
for run in paragraph.runs:
if XX in run.text:
run.text=依视路
prs.save(XX门店客流阶段性报告模板.pptx)
如果已经存在模板,则可以通过该方式对内容进行替换。
# 1.占位符id的打印
prs = Presentation(path.pptx)
slide = prs.slides.add_slide(prs.slide_layouts[0])
for shape in slide.placeholders:
phf = shape.placeholder_format
print(f”{phf.idx}—{shape.name}—{phf.type}”)
shape.text = f”{phf.idx}—{shape.name}—{phf.type}”
prs.save(“模板.pptx”)
# 2. 内容的填写
prs = Presentation(“path.pptx”)
slide = prs.slides.add_slide(prs.slide_layouts[0])
text1 = slide.placeholders[0]
text2 = slide.placeholders[1]
text1.text = “name1”
text2.text = “name2”
prs.save(“内容填充.pptx”)
在占位符中添加段落
# 1. 占位符id确认 为phf.idx
prs=Presentation(path.pptx)
slide=prs.slides.addlide(prs.slide_layouts[0])
for shape in slide.placeholders:
phf=shape.plachholder_format
print(f”{phf.idx}–{shape.name}–{phf.type}”)
shape.text = f”{phf.idx}–{shape.name}–{phf.type}”
# 第二个slide
slide=prs.slides.add_slide(prs.slide_layouts[1])
for shape in slide.placeholders:
phf=shape.placheolder_format
print(f”{phf.idx}–{shape.name}–{phf.type}”)
shape.text = f”{phf.idx}–{shape.name}–{phf.type}”
prs.save(**.pptx)
# 2. 段落添加
# 为第一个slide赋值
slide=pre.slides.add_slide(prs.slide_layouts[0])
slide_name=slide.placeholders[1]
slide_2=slide.placeholders[2]
slide_name.text=
slide_2.text=
slide1=prs.slide.add_slide(prs.slide_layouts[1])
shapes=slide1.shapes
title_shape=shapes.title#shape.title 等同于shapes.placeholders[0]
body_shape=shapes.placeholders[1]
# 添加标题文本
title_shape.text=
# 添加段落内容
tf = body_shape.text_frame
# 这句代码就是给body占位符添加内容!
tf.text = “带圆点的符号1”
p = tf.add_paragraph()
# 这个代码表示在原来的基础上,添加第一个段落!
p.text = “带圆点的符号2”
p = tf.add_paragraph()
# 这个代码表示在原来的基础上,添加第二个段落!
p.text = “带圆点的符号3”
prs.save()
给段落设置层级关系
prs=Presentation()
slide=prs.slides.add_slide(prs.slide_layouts[1])
shapes=slied.shapes
title_shape=shapes.title
body_shape=shapes.placeholders[1]
title_shape.text=
tf=body_shape.text_frame
df.text=
p=tf.add_paragraph()
p.text=
p.level=1# 默认层级为0,这个段落设置为1
p=tf.add_paragraph()
p.text=
p.level=2 # 构建一个三层的层级树
样式调整
添加一个文本框
prs=Presentation()
black_slide_layout=prs.slide_layouts[0]
slide=prs.slides.add_slide(black_slide_layout)
left=top=width=height=Cm(3)
text_box=slide.shapes.add_textbox(left,top,width,height)
tf=text_box.text_frame
tf.text=
调整文本框位置
tf.margin_bottom = Cm(0.1) # 下边距
tf.margin_left = 0 # 下边距
tf.vertical_anchor = MSO_ANCHOR.BOTTOM # 对齐文本方式:底端对齐
tf.word_wrap = True # 框中的文字自动换行
文本框颜色调整
fill = text_box.fill
fill.solid()# 纯色填充。
# 使用之前一定要导入RGBColor这个库
fill.fore_color.rgb = RGBColor(247, 150, 70)
文本框边框样式
line = text_box.line
line.color.rgb = RGBColor(255, 0, 0)
line.width = Cm(0.3)
添加段落
p=tf.add_paragraph()
p.text=
p.font.bold=True# 加粗
p.font.size=Pt(40) # 字体大小
段落对齐调整
p.alignment = PP_ALIGN.LEFT
其他调整:
1 .add_run() 添加新的文字块
2. .level
3. .line_spacing
4. .runs
5. .space_after
6. .space_before
字体样式:
1. font.name -  字体名称
2. p.font.blod 是否加粗
3. p.font.italic 是否斜体
4. p.font.color 字体颜色
5. p.font.size 字体大小
参考:
官方文档:python-pptx – python-pptx 0.6.18 documentation
Python小二:Python自动化操作PPT看这一篇就够了
pptx 批量操作幻灯片 | Python 技术论坛
python-pptx的基本使用 – 云+社区 – 腾讯云
python自动化办公之python操作PPT_Huang supreme的博客-CSDN博客
如何用python修改pptx,替换ppt的内容 – python,PHP学习

AI时代,掌握AI大模型第一手资讯!AI时代不落人后!
免费ChatGPT问答,办公、写作、生活好得力助手!
扫码右边公众号,驾驭AI生产力!